![Logotype-primary (1).png]](https://knowledgebase.getvim.com/hs-fs/hubfs/Knowledge%20Base/Logotype-primary%20(1).png?height=50&name=Logotype-primary%20(1).png)
Getting Started with Vim Connect
Vim Connect integrates directly into your Chrome browser to enhance your EHR experience. This guide walks you through installing Vim Connect on a Mac, verifying setup, and confirming you're ready to begin using Vim inside your EHR.
Step 1: Download the Vim Chrome Extension%201.png?width=282&height=121&name=Vim%20_%20Installation%20Instructions%20_%202022_Aledade%20Comments%20(1)%201.png)
- Open Google Chrome and go to vim.health/web
- You’ll be redirected to the Chrome Web Store
- Click “Add to Chrome” and confirm the installation when prompted
💡 If the extension doesn’t install, check your Chrome settings to ensure browser extensions are allowed.
Step 2: Pin the Extension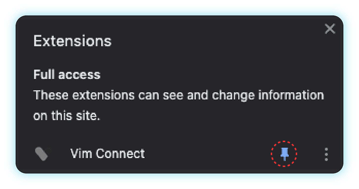
- Click the Extensions icon (puzzle piece) in the top-right corner of Chrome
- Find Vim Connect in the list
- Click the pin icon to keep it visible in your toolbar for easy access
💡 Pinning the extension ensures the Vim icon is always visible — it will turn blue when patient-specific insights are available.
Step 3: Enter Your Organization Key

- Click the Vim heart icon in your Chrome toolbar
- Click the pencil icon to open extension settings
- In a separate tab, log into Vim Console and go to the Organization tab
- Copy your Organization Key.
-
If you don’t have access, contact your Vim Admin or email support@getvim.com
- Copy your Organization Key.
- Return to the Vim extension, paste in the key, and click the checkmark to save.
💡 Your Organization Key links the extension to your practice. It only needs to be entered once per device.
Step 4: Restart Chrome & Log Into Your EHR
- Close all Chrome windows and relaunch the browser
 Log in to your EHR as you normally would
- You should now see a grey Vim heart in the top-right corner of your EHR interface.
 💡 The icon will remain grey until actionable patient insights are available — then it will pulse and turn blue.
After Installation: Activate Vim Connect
- The first time you log in to your EHR, you’ll be prompted to complete a one-time Vim login
- Once complete, you’ll see a confirmation message that your EHR is now connected to Vim Connect
- The Vim heart icon will now appear in your EHR and can be repositioned using the directional arrows
- When patient-relevant data is available, the icon will pulse and turn blue, indicating actionable insights
- Click the blue Vim icon to review the information and take action directly within your workflow.
Watch the Mac Installation Demo
Want to see the full process in action? This short video walks through each step of installing Vim Connect on a Mac.